Thursday, May 23, 2013

Domesticated Diva Post Cinco De Mayo Grub- Mexican Style Street Corn and Cilantro Avocado Chimichurri Sauce

What a month!  Can you believe May has almost come and gone!?  I am a little late posting this, but I wanted to share my recipe from Cinco De Mayo.  Me and Mr. Domesticated feasted on Mexican Style Street Corn, Cilantro Avocado Chimichurri Sauce, and Short Rib Steak Fajitas.  Yes, it was amazing!

Now that's a Cinco De Mayo feast!

The start of something special...the Cilantro Avocado Chimichurri Sauce

Cilantro Avocado Chimichurri Sauce (makes a little over 1 cup)
-3 Small Avocados
-1/2 Bushel of Cilantro
-1/2 Bushel of Parsley
-1 Jalapeno (seeds removed)
-1/2 of a White Onion
-Juice of One Lime
-3 Tbsp. of White Balsamic Vinegar
-1/4 Cup of Extra Virgin Olive Oil
-3 Cloves of Garlic
-Salt and Pepper to taste

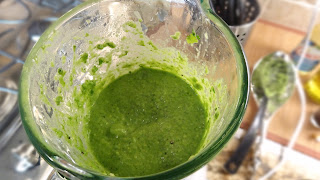
The Green Goodness...

All you have to do is put all the ingredients in a blender/food processor (except for the olive oil), and blend it up until it is thoroughly chopped up.  Then slowly add the olive oil until the consistency is smooth.

Served in my cute "New Mexican" inspired condiment dish =)

Now, on to the amazing Mexican Style Street Corn!  Oh yeah!  I decided to do a corn side dish, because it's delicious grilled and it was on sale six for a dollar at the grocery store.  Who can pass that bargain up!?


Mexican Style Street Corn (Makes 6 Servings)
-6 Fresh Ears of Corn (husk removed)
-3 Heaping Tablespoons of Margarine/Light Butter
-3 Heaping Tablespoons of Light Mayo
-4 Tablespoons of Parmesan Cheese (please don't use the cheap Kraft stuff lol)
-Salt, Pepper, Garlic Powder and Cayenne Pepper to taste

Grill your corn.  It takes about 8-10 minutes to get your corn slightly charred.


Heat up the margarine/light butter in the microwave until melted.  Mix in the mayo, salt, pepper, and garlic powder.  I used a whisk to make the mixing easier.


Once the corn is finished on the grill lather the butter/mayo mixture onto each of the corn.  Then finish the corn by sprinkling on the parmesan cheese and a couple dashes of cayenne pepper for color and a little heat.


Mr. Domesticated Divas Short Rib Steak Fajita...yum-o!


Closer look at this delicious masterpiece!  Mr. Domesticated Diva is a grilling master!


Thursday, May 16, 2013

Themed Bridal Shower...Eat, PINK, and Be Married

Have I told all of you that I absolutely love themed party!?!  I seriously might have an issue.  I attended a cute "Eat, PINK, and Be Married" bridal shower for a good friend of mine.  Her bridesmaids did an awesome job putting everything together from the food, decor, to the games.  Here are a couple pictures from the shower.
The amazing food provided by Central Market and the bridesmaids
How freaking stunning is this?!?


Hello Kitty Cookie Favors, Pink Colored Drinks, Cotton Candy Martinis, Yummy Sweets

I was able to contribute by doing the "Future Mrs." Banner and the table signs.

I bought all my supplies for the banner from Hobby Lobby.  I chose two patterns of paper.  One 12"x12" sheet is enough for one triangle bunt piece.  I followed Paper Bunting Youtube Tutorial

Here's some of the supplies I used...


First, I folded the paper in half.  Then, I marked where the seam in the middle was with a pencil.


Then, I did a diagonal fold that connected the pencil mark in the middle with the corner of the paper.


Then, all you have to do is cut along the seam.  I didn't do a double sided print like the video, because I thought the paper I used was thick enough and to save on time.


I then glued the letters onto the banner.  I created the letters on Microsoft Publisher and cut them out by hand.  Then, I punched holes at the corner ends on top and strung ribbon through.  Make sure the ribbon is slightly thicker than the hole, so the banner pieces will stay in place.


The Final Product

I also made three table signs (Keep Calm and Marry On, Pretty in Pink, and Lucky in Love).  I designed them on Microsoft Publisher, and they were put in the IKEA Tolsby frames.  I love those darn frames!


Fab pro pictures shot by my fellow blogger A June Affair. Check her site out!

                                       
                                                   Picture Courtesy of A June Affair


Wednesday, May 8, 2013

Skinny Minny Meal: Guilt Free Caesar Salad

Don't you love quick, easy, cheap, and healthy meals!!!! Because I sure do!  Who doesn't like Caesar salad?  The tangy, cheesy, and creamy flavor makes this a winner in my book.  The fact that I can make it guilty free is even better.

Ingredients:
(Makes About 1/2 Cup Dressing and 3 Servings of Salad)
-1 Bag of Romaine Lettuce
-1 Small Container of Fat Free Greek Yogurt
-1 Heaping Tablespoon of Parmesan Cheese (reserve an additional 1 Tablespoon for sprinkling on top)
-3 Anchovy Fillets (finely chopped)
-Juice of One Medium Lemon
-1 Clove of Garlic (Minced)
-2 Tablespoons of Worcestershire Sauce
-4 Tablespoons of Olive Oil
-Salt, Pepper, and garlic powder to taste (the more garlic flavor the better right!)
-Pan Fried Chicken Tenders (optional)


Mix the anchovies, garlic, Greek yogurt, lemon juice, Worcestershire sauce, Parmesan cheese, salt, pepper, and garlic powder together in a bowl.

Slowly drizzle in the olive oil and stir rapidly with a whisk to get out all the lumps.

The yucky Anchovy fillets, but I promise they make this dressing spectacular!

Before...ewww...to

After...ahhhh!!!
Place your Romaine lettuce in a salad bowl pour the salad dressing over it.  Toss to distribute dressing.  You may have to add a little more olive oil, if you like your dressing runnier.  Sprinkle the remainder of the Parmesan cheese and lightly toss again.  Enjoy!

Served with pan fried chicken tenders. Yum-o!

Friday, May 3, 2013

Home Sweet Home: Planting a Beautiful Container Garden 101

Since me and Mr. Domesticated Diva are brand new homeowners, I've decided to start posts dealing with home DIY, gardening, and interior design!  Please look out for posts labeled "Home Sweet Home" for home and garden inspirations.
It is warming up in Houston, so what better way to spend a nice weekend than working on the yard.  I absolutely love container gardens.  They are great for small spaces and can make a dramatic statement. 

I bought this absolutely gorgeous Texas theme flower pot at HEB.  It was only $20 with a $5 coupon, and it is fairly large!  Make sure you choose a pot with a drainage hole.


I bought an assortment of 4 different plants.  All are flowering plants. 

Here are the plants I selected:
Bulbine: Native to desert grasslands in South Africa, this plant grows well in a well-drained soil and is also very tolerant of poor, dry soil. Bulbine grows best in full sun, has succulent foliage, and produces racemes of star-shaped yellow with orange flowers in the summer months.
Blue Dwarf Katie Ruellia: Large lavender-blue flowers are backed by narrow, dark green foliage. Drought tolerant when established. Herbaceous perennial.
Becky Mix Rudbekia: Gloriosa Daisy hybrids are short-lived perennials, sometimes treated as annuals. Often these will survive a few winters, or at least self seed. This compact strain produces large black-eyed daisy flowers for months on end, in a wide range of shades from yellow through gold, orange and bronzy-red.
Grace Ward Lithodora: Beautiful, deep blue flowers cover this wonderful groundcover or rock garden accent. Sprawling with a slightly mounded form. Likes some shade in extremely hot areas.

The Bulbine is a taller plant, the Blue Dwarf Katie Ruellia and Becky Mix Rudbekia are low lying flowering plants, and the Grace Ward Lithodora is a crawling/trailing flowering plant.  It's good to mix and match different flowers, so that your arrangement is unique and complex.  Many people think that container gardens have to all be the same flower, but it doesn't!  Here's some great container garden arrangement from Better Homes and Gardens 


I used almost a whole bag of 2 cubic feet of Miracle Grow Garden Soil.  Make sure to space the flowers accordingly.  Water the flowers thoroughly after planting.  I placed the container near our front door.

Look How Pretty!
Upclose Shot of My Creation