Friday, September 27, 2013

Game Day Recipe: Texas Ranch Style Potato Salad

Who doesn't love to eat delicious food while watching your favorite football team (GO TEXANS)?!?  I know I sure love to eat and cheer on my team.  I have made this potato salad several times before.  I finally didn't forget to take pictures and document how this simple yet delicious side dish is created. 


It is "Texas Ranch Style" because this potato salad does not contain any mustard what so ever. 

It is made from six simple ingredients:
(Makes about 10-12 servings)
-4 pounds of small red potatoes
-1 small tub of sour cream (I used the light version)
-3/4 cup of mayo (I used the light version that is made with Olive Oil)
-1 packet of dry ranch dressing mix
-salt, pepper, cayenne pepper, and garlic powder to taste
-1 package of bacon
-1 bunch of green onion finely sliced

1.) Boil some water in a big pot with a little salt.  Once the water starts boiling, add the potatoes. The potatoes will take about 15-20 minutes to cook.  Do not boil them till they are too soft or else your potato salad will be more like mashed potatoes...yuck!
 
2.)  Once the potatoes are done.  Drain the pot, and rinse the potatoes under cold water. 

3.) Slice the potatoes in about 1" cubes.


4.)  Mix the mayo, sour cream, dry ranch dressing mix, salt, pepper, cayenne pepper, and garlic powder in a bowl.
  

5.) In a large boil, mix the dressing mixture and sliced green onions in with the potatoes.  Cover the potato salad and place in the fridge for at least 3 hours. 

6.)  Right before serving, fry up the bacon.  Chop the bacon into 1/4" pieces.  Mix the bacon pieces into the potato salad and serve!

Thursday, August 29, 2013

Home Sweet Home: Knockout vs Knockoff (Interior Decorating on A Budget)

After moving from an apartment to an almost three thousand square foot house, I knew we were going to need a lot of house decor and furniture.  I wanted our house to have a country modern feel (i.e. rustic woods, antique niches, soft warm colors, copper and bronze metal finishes).  There are ton of stores in the Houston area where you can find great decor and furniture at a great price such as Homegoods, Kirklands, Garden Ridge, Ashley Furniture, World Market, Hobby Lobby, Ross, and even Walmart.

Here are some tips for bargain decor shopping:
  • Look at sales ads
  • Print coupons (many stores have coupon on their website or will send you coupons to your email when you register your email)
  • Look for the sale or clearance aisle.
  • Browse website like Pinterest, store websites, Better Homes and Garden, and HGTV for inspirational ideas.

Here are some of the Knockout vs. Knockoff finds I have found at these stores... 

--Ethan Allen Leather Accent Chair vs. Ashley Furniture Durablend Leather Recliner--

--Crate & Barrel Taverna Dining Bench vs. Home Goods Rustic Wood Bench--


--Ethan Allen Balta Ottoman vs. Walmart Better Homes and Garden Ottoman--


--Z Gallery Succulent Garden Decorative Balls vs. Hobby Lobby Decorative Topiary Balls--


--Sur la Table Hand-Painted Rooster vs Hobby Lobby Resin Rustic Rooster--

--Restoration Hardware Fishing Weights (Set of 4) vs. Home Goods Antique Inspired Fishing Weight--
--Pier One Glass and Iron Hurricane Candle Holder vs. Kroger's Hammered Glass Hurricane--


--Pottery Barn Faux Hydrangea Arrangement vs. Ross Faux Hydrangea Flower Arrangement-- 
--Pottery Barn Tolix Barstool vs World Market Arlo Barstool--
--Restoration Hardware Monastery Collection vs. World Market Greyson Table--


Friday, August 9, 2013

Home Sweet Home: DIY Housewarming Party Decor

So we had our housewarming party a couple weeks back, and I have to say we throw one heck of a partay.  We had an awesome time with close family and friends, and we can't wait to host our next get together! 

I wanted to do a couple of decorations and nice touches for our housewarming party. 

Here's what I made:
  • Two Bunting Banners
  • Decorative Table Signs
  • Two Different Types of Floral Arrangements
  • House Cake Topper
  • Paint Chip Paper Garland 

-Bunting Banners-

I have made this before for a bridal shower I attended a couple months back.  See here. I used three different patterns of paper.  I was able to score a really good deal on paper at Michael's.  It was 5/$1!!!  That is a really good deal! Both of these banners cost under $3 to make!
  
"Home Sweet Home" Bunting Banner


With the leftover paper, I made a smaller bunting banner to put in our breakfast nook.


-Decorative Table Signs-

I used my favorite Ikea Tolsby Frames for my decorative signs.  I absolutely love these frames!  I made two signs.  One saying "Home Sweet Home" and the other one is a "Home is Where the Heart is" sign.  I designed both signs using Microsoft Publisher.


-Floral Arrangements-

I just love fresh flower arrangements.  I think it gives any party that extra special touch.  I found an awesome place to score cheap fresh flowers...Krogers.  Krogers usually discounts almost past shelf life grocery items, and I guess they do the same for their floral department.  I scored a dozen roses for $3.50 and a bouquet of sunflowers for $5!  I mean super steal! I used my glass vases that I purchased at the Dollar Tree.  My sisters helped me arrange the flowers.  We came up with a good idea of tying the sunflowers together with tulle.  We were able to make two short arrangements and two larger arrangements.  I think they turned out fabulous.  We placed the floral arrangements on the kitchen bar close to the family room and on the breakfast nook table.


-House Cake Topper-

We decided to have a Tres Leche sheet cake for our "housewarming" cake.  I wanted to jazz up the cake a bit, because sometimes sheet cakes can be a bit boring.  I found this cute wood cut-out of a house at Hobby Lobby.  It was only 29 cents! 


I used some craft paint and stickers I had lying around to decorate the wooden house cut-out.


I painted the roof portion in purple, and the rest I painted in green.  I used painters tape to get a straight line.  Here's the final product...

 
Us with our yummy cake!

-Paint Chip Paper Garland-

I have seen several ideas for using paint chips as decorations.  Here are some good ideas from Brit + Co.  I grabbed a whole bunch at our local Home Depot.  It's free so it's not stealing right?  I wanted the garland to match the bunting banner, so I chose green, blue, and orange paint chips.  The best thing about this DIY party decor is that it is entirely free (if you already have ribbon, a paper punch, and a hole puncher)!


I used my awesome craft punch and punched six scalloped circles out of each paint chip. 


I then used my hole puncher and punched two holes in each circle.  Make the holes near the edge of the circle.


Thread a thin ribbon through the paper circles.  I made three separate garlands.  Each garland being a different color.  So, I had one orange, one blue, and one green garland.  Here's the final product.

  
It doesn't have to cost a fortune to decorate for a party.  Just use your imagination, find those bargains, and reuse what you have!  I hope your next party is a fab one!

Thursday, August 1, 2013

Home Sweet Home: DIY Picture Wall Collage

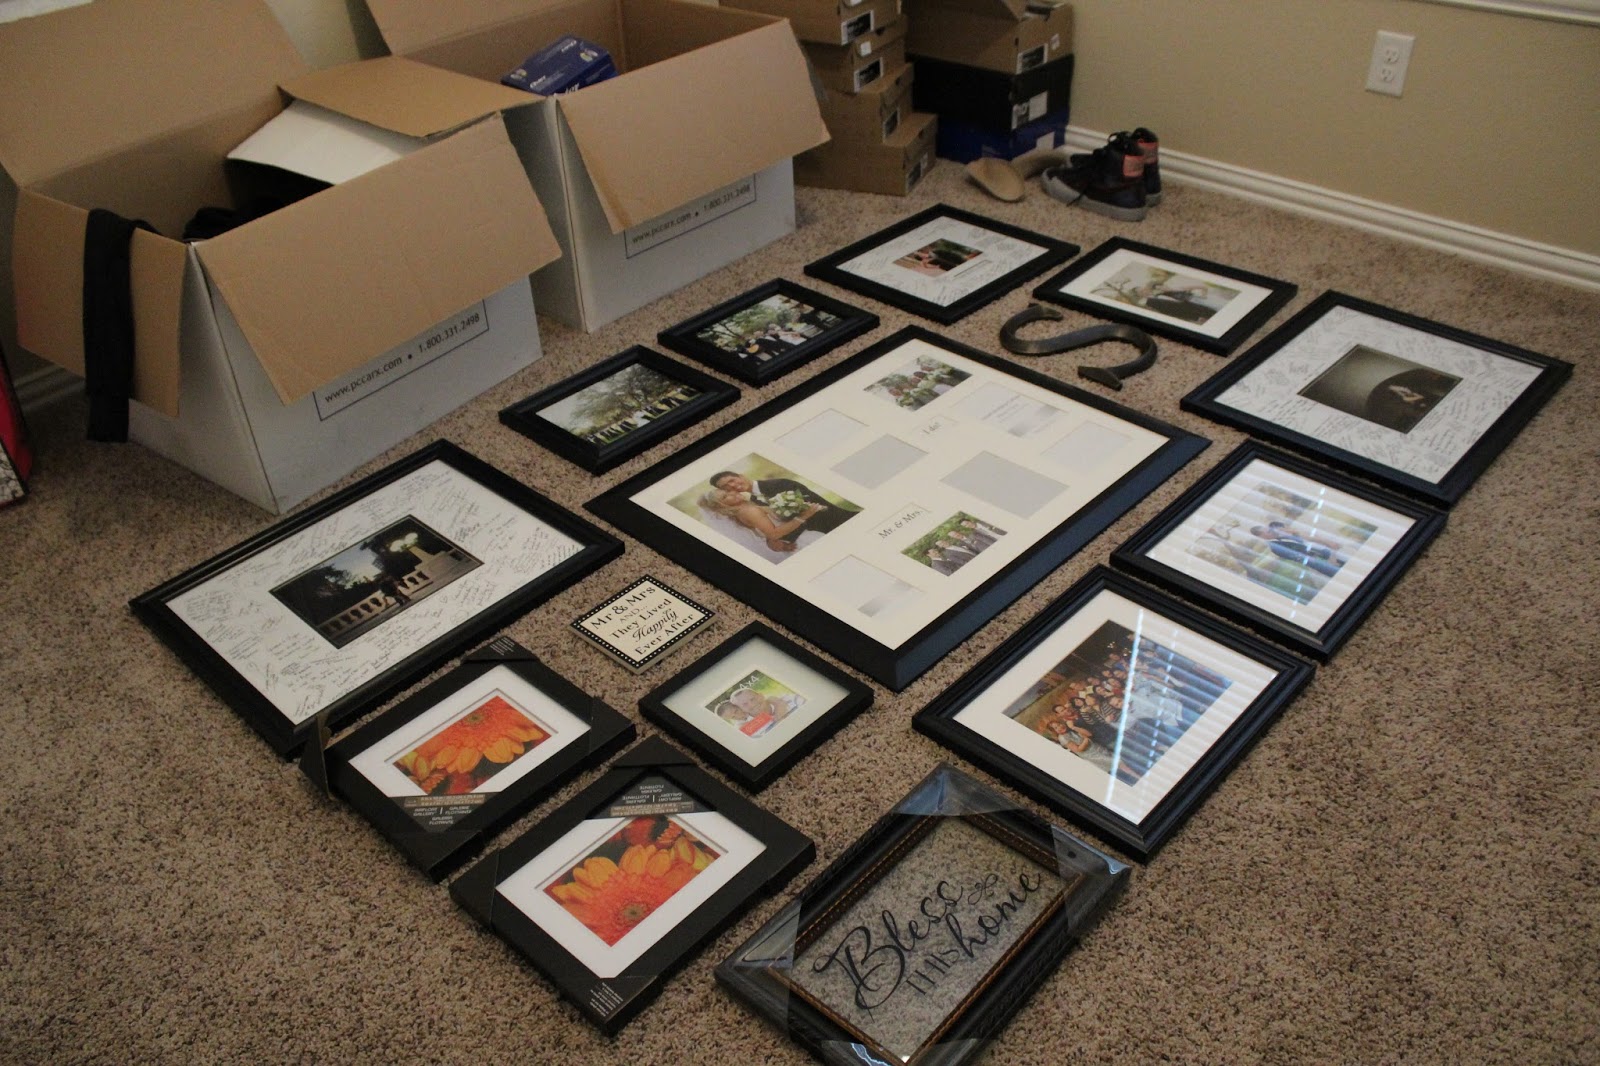
Our front entry way was lacking some pazazz.  I mean one can only stare at a bare wall for so long.  We received quite a few picture frames from my mommy-in-law, and I really wanted to utilize them in that space.  I also thought it was time to hang up some of our wedding and engagement pictures.  I found this genius way of hanging pictures on Pinterest.  Pinterest seriously has the answers to all of life's questions.


Picture found on Pinterest

It is really genius, because it is so simple.

All you need is:
-A Roll of Brown Craft Paper (you usually can find this where the gift wrapping paper is)
-Painter's Tape
-Pencil
-Hammer
-Picture Hanging Hardware (you can find a cheap pack of them at Home Depot)
-Picture Frames, Wall Letters, Wall Decor, etc.

Some tips for choosing frames and wall decor:
-Use the same color scheme (I used black frames.)
-Choose unique wall decor elements like initial letters, inspirational quote wall art, small mirrors, small decorative elements, etc.)  I found Hobby Lobby had a lot of neat wall decor and at great prices.
-Space your frames and wall decor evenly.  I find spacing them closer together gave them a finished look. DON'T SPACE THEM TOO FAR APART.
-Play around with the collage arrangement on the floor.  Make sure you move the items around until you get the look you want. 
-Make sure your arrangement has some sort of symmetry.  I had a center frame as a focal point and worked my way out.  You can also form a square/rectangle with your frames to make it more appealing.

Step 1: Trace your frames and wall decor on the brown craft paper with a pencil.  Then cut along the outline. Write which picture or wall decor on the front side of the craft paper.  That way when you tape the craft paper to the wall you know which frame goes there.  For instance, for the below frame I wrote "Bless This Home Frame" on the front of the craft paper cut out.


Step 2: Flip the picture frame or wall decor, so the backside is facing up.  Find where the nail should be on the hook.  Make sure it's centered and poke a hole through the craft paper.  Now do this to the rest of the frames and wall decor.


Step 3: Figure out your wall collage arrangement.  This took me awhile to figure out, but I eventually came up with this.  I then took a picture of the arrangement, just to make sure I was placing the frame or wall decor in the right place on the wall.

 
Step 4: Tape the cut outs to the desired wall.  I just taped the corners of the cut outs, so you don't have to waste more tape than you need to.


Step 5: Hammer in the picture hanging hardware into the holes you made earlier.  Carefully, peel away the craft paper and hang your frames and wall decor. 


I did not have to redo any of the holes I made, because this technique is so accurate.  This does take a little more time, but as you can see the extra work really does pay off.


Thursday, July 25, 2013

(Not So) Extreme Couponing...the Domesticated Diva Way!

So I finally realized what all this couponing fuss was all about.  I have caught an episode or two of the reality show Extreme Couponing, which looks more like an episode of Hoarders to me...lol  I didn't want to go too extreme with this couponing thing, because I do have a life. I started my coupon journey about 2 months ago.  My favorite stores to coupon at are Walgreens and HEB. HEB because I grew up shopping there, and Walgreens because we have one in our subdivision!

Here are my tips for average couponing:
  • Look on sites like http://www.coupons.com/, http://www.save.com/, http://www.smartsource.com, http://www.couponnetwork.com, and http://www.healthyessentials.com ...you don't have to get the Sunday paper to coupon!  They have internet printable coupons which are all free! Print the maximum times allowed (which is usually two).  You can also print more if you have an additional laptop or computer.
  • Also look at the company's website or Facebook page...you are more than likely to find some coupons under a promotion's tab or by signing up your email account.
  • Also, check out this Slick Deal link...they have tons and tons of internet printable coupons.
  • Sign up for apps on your mobile phone like ibotta and Receipt Hog.  You can earn even more money by stacking coupons with ibotta deals!
  • Only clip and buy items you will use.  I love stocking up on non-food items (shampoos, razors, shaving cream, soap, toothpaste, tooth brushes, etc) because they will never really expire like food.
  • Learn your store's coupon policy.  Every store is different.  I personally shop at HEB, but their coupon policy is probably the worst one.
  • Search next week's ad so you can prepare for your shopping trips.  Store ads are available online about a week prior.  This will get you an idea of what coupons to use and to try to get the coupons you need. The I Heart Wags website is a good site to preview Walgreens ads. 
  • Visit coupon blogs!  My favorites are Hip 2 Save, Wild for Wags, HEB Bargain Hunter, and The Krazy Coupon Lady.  I visit these blogs at least twice a day.
  • If you can stack your coupons (I stack coupons at Walgreens, but HEB does not allow stacking) do it!  Stacking means using a "In Store" coupon with a Manufacturer's coupon.  You can have big savings by doing this!
  • Walgreens lets you use two coupons for "Buy One, Get One Free" deals.  You can save some serious dough with these deals!
  • Walgreens also has a catalina promotion called Register Rewards.  This means if you buy a certain item or certain amount of items, you will get a reward coupon back for your next purchase which is essentially free money. 
  • Also register an account with HEB.  They will usually send special in store coupons.  For instance, they had a coupon promo during the 4th of July...$3 off any $3 Produce Purchase and $5 off any $15 meat purchase!  What an awesome deal!
Here are some examples of past deal I scored at Walgreens:

This is a great deal considering Ozarka water at HEB is $3.69.  You also get one of those awesome Register Rewards catalinas, so it's like getting this 24 pack of Ozarka water for $2.49!

Buy one Right Guard deodorant ($4.49) and get a second free.  As I mention with Walgreens, you can use two coupons on BOGO offers!  I had (2) $1.50, which is a savings of $3.00.  I paid $0.75 for each deodorant!

Buy one Dial Body Wash ($5.79) and get the second free.  I used (2) $2.00 manufacturer's coupon, which is a savings of $4.00. I paid $0.89 for each body wash!

I used a $1.00 manufacturer's coupon, and paid $0.29 for Butterball Turkey Bacon!

Buy one Dial Hand Soap ($2.99) and get one free.  I used a $1 off 2 coupon, so I paid $1 for each Dial Hand Soap!

Buy one Organix Shampoo ($7.99) and get one free.  I used (2) $2.00 manufacturer coupon, and saved $4.00. So, I paid $2.00 for each Organix Shampoo!

I used one $0.75 manufacturer's coupon and one $0.50 Walgreens coupon.  So, I saved $1.25 and I paid $0.74 for a bottle of Simply Lemonade!

I used a $1.00 manufacturer's coupon and with the $0.75 ibotta credit (see right pic), I saved $1.75.  So, I paid $1.74 for 9 rolls of toilet paper, which ends up being just over $0.19 per roll!  What a deal!

Couponing can be an easy hobby to do during your spare time.  I mean who doesn't love saving money!

Friday, June 21, 2013

Fauxreal Meals: Pork Rind and Parmesan Fried Pork Chops

Mr. Domesticated Diva and I have been trying to eat less carbs during the week.  I have seen pork rinds being used as batter for low carb cooking, but I was too afraid to try it.  Well, this week I grew some balls (not literally) and gave it a whirl.  Here's what you will need...


Ingredients (Make 2-3 Servings):
-6 Thinly Sliced Bone In Pork Chops
-1 Cup of Semi Finely Crushed Pork Rinds (I just put the pork rinds in a small zip lock bag and crushed it with a mallet)
-1/4 Cup of Grated Parmesan Cheese
-2 Eggs (Beatened)
-Salt, Pepper, Paprika, Garlic Powder, and Cayenne Pepper to taste (Remember not too much salt, because the pork rinds and Parmesan cheese is loaded with Sodium)
-Extra Virgin Olive Oil for frying (about 1/3 cup)

Heat up the extra virgin olive oil in a frying pan to medium high heat. 

Mix the crushed pork rinds, parmesan cheese, salt, pepper, paprika, garlic powder, and cayenne pepper in a bowl.  In a separate bowl, add the beatened eggs.


Dip the pork chop in the egg mixture and then the pork rind/parmesan mixture.  You may have to slightly press the pork chops in the pork rind batter to make sure it sticks.  Then, shake off excess pork rind/parmesan crumbs.


Fry the pork chops about 3 minutes per side.  Since these are thin, they will fry up pretty fast.

Here's the final product.  I also made parmesan oven roasted zucchini.  This meal was quite delish.  I have to admit I think I like this pork rind/parmesan breading, better than the flour/breadcrumb type.  It was very flavorful and crisp.  This recipe is definitely a keeper =)

Friday, June 7, 2013

When I Juice, You Juice...Domesticated Diva's Juicing Adventures

So I got bit by the juicing trend, and I can say juicing is amazing!  I found this Black and Decker Juicer randomly at Kohls for $25.  I mean come on...$25 for a juicer is a pretty amazing deal!  It got a four star rating on Amazon, so I decided to give it a shot. 
This is one of the most basic juicers you can buy, but at $25 I am not complaining.  I wasn't even sure if I was gonna like juicing, so this is perfect for the beginning juicers out there!  You do have to cut up your veggies/fruits, since the tube the fruit/veggies goes down is rather narrow.  Also, the juicing cup in the picture is rather small and needs to be dumped into a pitcher or whatever juice container you are using.

Let's back track a little, I got into juicing after watching the documentary Fat, Sick & Nearly Dead.  This is a great documentary by the way =)


Joe Cross (the guy in the film) also has a blog called Reboot with Joe. His blog is chocked full of different juicing recipes. 

The Basic Domesticated Diva Juicing Recipe I usually go by is 2 Veggies + 2 Fruits + Either Ginger Lime or Both

Seems simple enough right!  Yes, juicing can be expensive, but if you buy whatever fruits and veggies are on sale or buy the fruits and veggies that are usually cheaper you can definitely juice on a budget!

Fruits I've Used: Apples, Grapefruit, Lime, Blackberries, Pears, Mangos, Peaches, Oranges
Veggies I've Used: Celery, Parsley, Cucumbers, Ginger, Carrots, Red Pepper

Here are a couple of recipes...

2 Green Apple + 1" Ginger Piece + 2 Stalks of Celery + 1 Lime + 1 Cucumber


1 Small Carton of Blackberries + 1/2 Bushel of Parsley + 1 Apples + 1" Ginger Piece + 1 Lime + 2 Stalks of Celery


1 Red Pepper + 2 Carrots + 1 Apple + 1 Orange


2 Apples + 1 Red Pepper + 1 Cucumber + 1 Lime


2 Mango + 1 Cucumber + 1 Red Pepper + 1 Orange Juice